Magnetic Bookmarks


Make your own magnetic bookmarks
Magnetic bookmarks are a fun variation of the ordinary bookmark.
These magnetic bookmarks fold in half and have two magnets on the inside - one on the front section and one on the back section. This means that when the front and back sections come together, they snap shut because the magnets attract each other. This means that you can snap your bookmark in place to mark the actual line you are up to on the page by putting the bookmark in on its side (horizontally).
On this page I'll be giving you a picture tutorial of how to make some fun bookmarks which you can print out after you purchase the templates. They are easy to put together and make perfect party favors for
* kids' birthday parties,
* baby showers or
* bridal showers.
They also would make a novel craft market idea or cute stocking stuffers.

What you need to make the bookmarks
printable bookmark template
scissors
craft knife (optional)
cutting mat (optional)
craft ruler (optional)
double-sided tape
thin magnets
In this tutorial, I have used recycled magnets which I peeled off the back of advertising cards. You really want the magnets to be reasonably strong since they have to grip through a book page. Some of my recycled magnets were not really strong enough, but others worked well. It is best to get two magnets which snap together when you bring them near to each other. You also don't want really thick magnets because you don't want to damage your book by putting something too fat between the pages.

Step 1: Print and Score
Print out the bookmarks on card or photo paper. I like to use photo paper because it makes the colors more vibrant and clear.
On all the printable kits I am featuring on this page, there is a fold line marked on the page. Score along the fold line before cutting out the individual bookmarks.

Step 2: Cut and Fold the Bookmark
Cut out the bookmarks and the embellishments. I like to use a craft knife and ruler for long straight edges and scissors for the curvy bits.
Tip: if you want to make it quicker and easier to cut out the embellishments, you could simply cut off any small fiddly bits which are duplicated on the front on the bookmark. For example, you could cut off the crab's legs and top knot, but not his left claw because it extends past the top of the bookmark.
Now fold the bookmark along the line which you scored.

Step 3: Stick on the Embellishment
Stick the embellishment to the top the bookmark, lining up the picture. I like to use double-sided tape. I find that glue tends to warp the item after it dries. You could use thin or thick tape. Thick tape will give the bookmark a more 3D appearance. I have used thin tape because I didn't want a fat bookmark to go in my books. However, as you will be using a magnet anyway, you could use some tape which is not too thick.
In the picture you can see I have stuck the tape onto the bookmark rather than the back of the embellishment because I could see exactly where to put the tape. Bear in mind that if you have cut off the legs on the embellishment, then you don't want to put tape there.
You may have noticed on my picture that I missed putting tape on one of the legs =P. I noticed after I had taken the photo and peeled off the backing. So I stuck on the extra tape but didn't take another photo.
Here's a picture with the embellishment stuck on
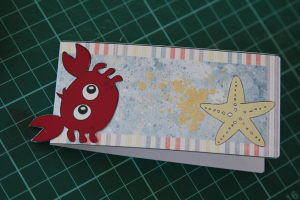
... notice how it overlaps the top of the bookmark

Step 4: Attach the Magnets
Now the final step - attach the magnets to the inside of the bookmark.
The best way to do this is to attach one magnet to one side of the bookmark. I used recycled magnets, so I used double-sided tape attach my magnets. Now connect the other magnet to first one and add your tape (if you using any) to the back of this magnet. This will ensure that the magnets line up properly when the bookmark is closed. Now fold the other side of your bookmark over the top and push down firmly to make sure your magnets stick well.
** Printable magnetic bookmarks for the pictures below. **

Here's some more printable kits to make magnetic bookmarks
Classy boutiques
This set of three pastel-colored boutique bookmarks would make a really cute gift for a lady or teenage girl. They would also make sweet bridal shower or baby shower favors.

Cute Puppies
How cute are these! Any dog lover would love these bookmarks. They may even encourage the reluctant reader to spend more time with his books.
The caption reads This is where I fell asleep.

Sweet kitty cats
Cat lovers are sure to adore these sweet bookmarks. One of these is definitely a Siamese cat and the others are probably an American shorthair and a Domestic shorthair. What do you think?
The caption reads This is where I fell asleep.

Woodland creatures
Here are some cute woodland creature bookmarks which children will love, either as a gift or to make themselves. There is a raccoon, a fox, and a squirrel.
The captions read: Here's my spot
This is where I fell asleep
Buried treasure here.

Pink and green owls
Owls are very popular right now, particularly with teenage girls. These funky owls are pink and green with different patterns on their bodies and wings.
The caption reads This is where I fell asleep.


